Kitchen note 005 · Baking
Choose a sheet pan by the usable surface, not the name
“Half sheet” and “heavy duty” are only a starting point. The useful specification includes the pan’s true footprint, flat cooking area, construction, heat limits, cleaning path and the oven it must fit.
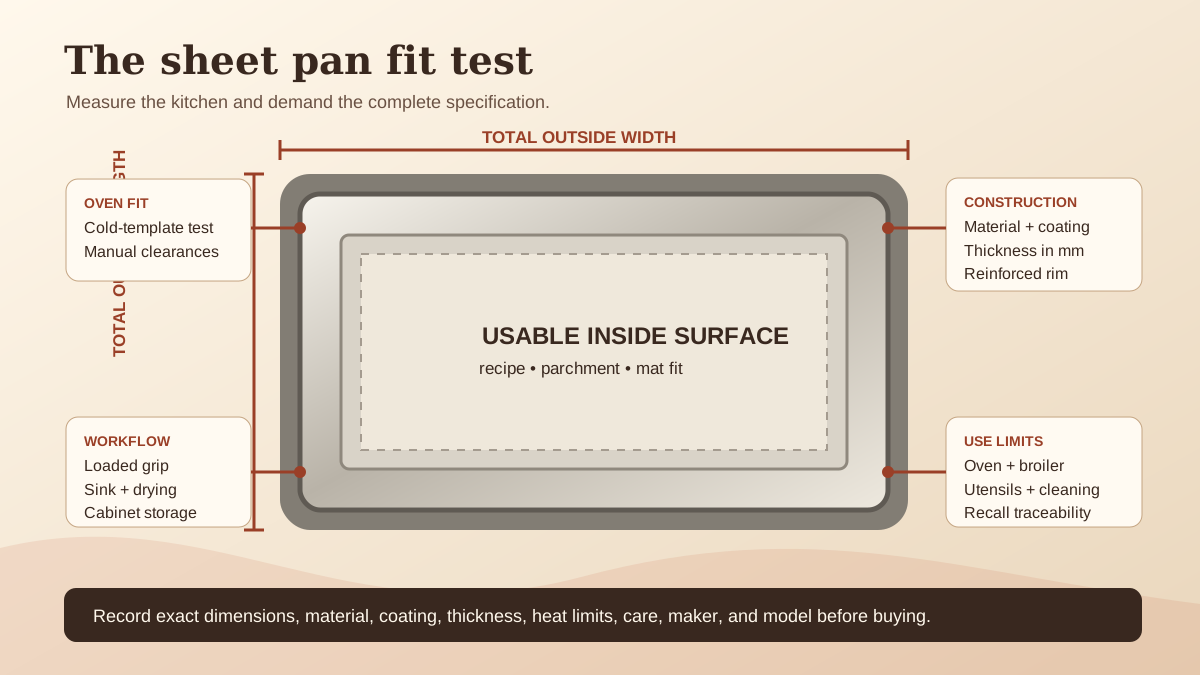
A sheet pan looks simple enough to buy from a photograph. The common disappointments begin where the photograph stops: the advertised size describes a family rather than the exact footprint; rolled rims reduce the flat area; a liner overhangs or buckles; the pan touches an oven wall; a dark finish browns a familiar recipe faster; or the pan is too wide for the sink and cabinet.
Penn State Extension describes the everyday distinction clearly. A rimmed baking sheet, sometimes called a jelly-roll pan, has raised edges that contain food and juices. A classic cookie sheet is flat on three sides with a slightly raised edge, which encourages air circulation and lets cookies slide off. Neither form is automatically better. The right one follows from the recipe, the appliance and the complete handling path.
The questions readers ask around sheet pans are practical: Will a half sheet fit this oven? Does gauge tell me how stiff it is? Is bare aluminum appropriate for tomato-based food? Why did a pan make a loud pop in the oven? Will a silicone mat fit inside the rim? Can the finish go under a broiler? A useful listing should let a cook answer those questions before purchase, without relying on a brand reputation or a vague “commercial grade” claim.
1. Start with the food and method
Write down the recurring jobs. Drop cookies need a flat, predictable baking area. Roasted vegetables need enough room for a single layer and a rim that contains oil and pieces during transport. A pan placed below a casserole to catch drips needs a safe footprint, heat limit and oven position. Sheet-pan dinners may combine ingredients with different cooking times, food-safety needs and moisture loads.
USDA’s MyPlate roasted-root-vegetable recipe calls for spreading the vegetables in an even layer on a baking sheet or pan. That short direction carries a buying consequence: usable area matters more than the nominal family name. Crowding changes the cooking result. For recipes involving raw meat or poultry, pan size never substitutes for checking the food with an appropriate thermometer. Our food-thermometer guide explains probe geometry, sensing area, stated accuracy and cleaning limits.
Flat area and finish
Record the recipe’s pan size, batch spacing, liner size and expected browning. A raised rim can change access even when the pan fits.
Area and containment
Choose enough usable surface for an even layer, plus a rim that contains food and oil on the route to the oven.
Separation and temperature
Plan raw-food separation, thermometer access, cleanup and a landing zone. Follow the recipe and current safety guidance.
Appliance permission
Use a pan below food only when the oven and cookware instructions allow that position without blocking vents or heat.
A rim is not a license to fill the pan with more liquid than the maker permits. A shallow vessel can slosh during lifting, and food can shift when the pan flexes. For a braise or another liquid-heavy method, a deeper roasting vessel may be the better tool. Our roasting-pan guide covers loaded weight, handle span, headroom and rack fit.
2. Decode the size name, then measure the real pan
Penn State Extension identifies 13 by 18 inches as a common pan for home use and notes that some home ovens can take pans up to about 16 by 22 inches, while larger pans are often commercial. Treat those figures as orientation, not a clearance rule. Pan makers round dimensions, rim shapes vary, and appliance cavities are not standardized around marketing names.
Ask for four measurements: maximum outside width, maximum outside length, inside opening at the rim, and flat usable floor. Add the rim height. If a rolled or reinforced edge projects beyond the wall, it belongs in the outside footprint. If corners curve inward, they reduce liner fit and usable area. A product page that gives only “half sheet” or one nominal dimension leaves the decision unfinished.
| Measurement | How to use it | What a listing should show |
|---|---|---|
| Outside width | Compare with rack width and required side clearances | Widest point across rim or handles |
| Outside length | Compare with closed-door depth and front clearance | Longest point, including projections |
| Inside rim | Check access, rack and liner placement | Opening below the rolled edge |
| Flat floor | Plan cookie spacing and even-layer capacity | Usable rectangle before curves and slopes |
| Rim height | Assess containment, grip and utensil access | Inside floor to top edge |
Make a cold oven template
Read the oven manual first. With the appliance off and completely cool, cut cardboard to the sheet pan’s maximum outside dimensions. Place the template on the intended rack, check the closed-door depth and verify the manual’s required clearance from walls, door, elements, sensors, vents and convection openings. Remove the cardboard before the oven is switched on. This test checks footprint only; it does not prove that the material, coating or pan is approved for the planned temperature or rack position.
Repeat the fit test for a countertop oven rather than assuming a full-size pan can be scaled down by name. Account for interior handles, rack stops and door geometry. Never let a pan rest on heating elements or the oven floor unless the appliance manual expressly describes that use.
Fit the recipe and liner to the inside
Compare a recipe’s specified pan size with the flat floor, not the outside rim. A silicone baking mat must lie flat inside the walls and be approved by its maker for the temperature and cooking mode. Parchment should be used only within its manufacturer’s temperature and mode limits; keep it away from exposed elements and open flame. Do not use a liner to hide a damaged coating or to make an unapproved broiler setup seem acceptable.
If a rack will sit in the pan, verify its footprint, feet, coating compatibility, load and height. A rack that rocks on a curved corner or concentrates weight on a coated surface is not made compatible merely because it fits between the rims.
3. Ask for construction in measurements, not adjectives
“Heavy gauge,” “professional,” “warp resistant” and “commercial” do not identify material, thickness or performance. Request the exact base material or alloy, thickness in millimeters, coating or finish, rim construction, overall weight and country or maker traceability. Gauge numbers are especially easy to misread because the relationship between gauge and thickness depends on the metal and convention. Millimeters make products easier to compare.
A thicker pan of the same material and geometry is generally stiffer, but thickness alone does not guarantee a flat pan at every temperature. Metal expands as it heats. Uneven heating, abrupt temperature changes, rim tension, stamped geometry and manufacturing tolerances influence movement. A reinforced or encapsulated rim can add stiffness, yet the maker should still state permitted heat, broiler use, cooling and warranty terms. Treat “warp proof” as a claim that needs a defined test and remedy.
| Construction | Ask for | Plan around |
|---|---|---|
| Uncoated aluminum | Alloy, thickness, finish, food-contact directions, maximum heat, maker and origin | Scratching, denting, dishwasher discoloration and directions for acidic food |
| Aluminized steel | Core and surface description, coating if any, edge treatment, thickness and care | Weight, corrosion prevention, scratches and drying |
| Stainless steel | Grade or construction, thickness, weight, finish and heat limits | Different heat response, possible sticking and cleaning effort |
| Coated nonstick | Coating identity, application, heat and broiler limits, utensils, cleaners and retirement signs | Abrasion, finite surface life and recipe browning changes |
| Dark or colored finish | Material beneath it, coating identity and recipe guidance | Potentially faster or darker bottom browning; test familiar recipes carefully |
Penn State Extension describes aluminum as practical because it heats evenly and cools quickly, while noting that it can scratch or dent and may react with acidic ingredients such as tomatoes or citrus, producing a metallic taste. That is a reason to follow the exact maker’s food-contact instructions and choose a suitable vessel for the recipe, not a reason to treat every aluminum pan as the same.
Montana State University Extension’s baking curriculum recommends heavy-gauge, shiny aluminum cookie sheets and notes that dark sheets can overbrown cookie bottoms. The useful lesson is to match pan finish and recipe expectations. A new finish may require a carefully observed test batch rather than an automatic substitution in a familiar time-and-temperature routine.
Traceability belongs in the specification
In December 2024, the FDA warned retailers and distributors that certain imported cookware made from aluminum, brass and aluminum alloys could leach lead into food. The agency said sellers are responsible for ensuring the products they distribute are safe and compliant. The notice does not say all aluminum cookware is unsafe. It does make the seller, manufacturer, material, model and supply path essential facts rather than optional merchandising copy.
Before buying, look for an identifiable maker, model or item number, material disclosure, food-contact documentation, country of manufacture, care instructions and a way to receive recalls. A listing assembled from anonymous marketplace stock without a traceable responsible company cannot support that check. Search current FDA recalls and safety alerts using the exact product identity when a concern arises.
4. Verify every heat and use limit
“Oven safe” is incomplete. The listing should state the maximum oven temperature, whether that limit changes with time or accessories, and whether broiler use is permitted. Coatings, silicone grips, bonded parts, racks and liners can have lower limits than the metal body. The lowest applicable limit controls the setup.
- Oven: match the pan, liner, rack and recipe to the maker’s stated temperature and the appliance manual.
- Broiler: require explicit permission and the required distance from the element. “Oven safe” does not imply broiler safe.
- Stovetop: do not place a sheet pan across burners unless both the pan and appliance makers approve that exact use.
- Grill or open flame: require explicit instructions; handles, coatings and warping behavior may differ from oven use.
- Freezer-to-oven: avoid abrupt thermal transitions unless the maker provides a specific procedure.
- Microwave: metal sheet pans do not belong in a microwave oven.
A pan can make a popping sound as stresses shift during heating. Sound alone does not diagnose safety or quality. If the pan distorts enough to become unstable, spills food, contacts an oven surface, damages a coating or no longer sits as its maker specifies, stop using it and consult the manufacturer. Do not flatten a hot pan by hand or shock it with cold water.
For a coated pan, follow the stated utensil and cleaning rules. FDA Food Code language for food-service equipment says nonstick cookware, including cookie sheets, should be used with nonscoring or nonscratching utensils and cleaning aids. Home cookware instructions remain model-specific, but a seller should make those restrictions visible before purchase.
5. Plan the raw-food, cleaning and storage workflow
A sheet pan used for raw meat or poultry needs a controlled route from prep to oven and then to washing. Keep it from ready-to-eat food and clean tools. Do not return cooked food to a surface that held it raw unless that surface has been properly cleaned. If the same pan will also bake cookies, decide whether your cleaning process and allergen plan support that sharing or whether separate, clearly identified pans are more practical.
The FDA Food Code’s useful cleaning benchmark is that food-contact surfaces are clean to sight and touch; cooking and baking equipment should be free of encrusted grease and other soil. At home, follow the pan maker’s detergent, soaking, dishwasher, abrasive and drying instructions. Rolled rims, seams and corners should not trap residue or water beyond reach.
Measure the sink basin, dishwasher rack, drying area and storage slot. A full-size pan may fit an oven yet be awkward to wash without hitting the faucet or spreading raw juices. If it will be stored vertically, add a divider so the pan cannot fall or bow under other cookware. If pans are nested, use a clean, dry protector allowed by the manufacturer, especially for coated surfaces.
Inspect the pan while clean and cool. Look for a loose or split rim, sharp edge, severe dent, corrosion, coating that chips, peels or blisters, and distortion that makes handling unstable. Follow the manufacturer’s replacement criteria. A stained uncoated surface is not automatically unsafe, and a pan that looks shiny is not automatically sound; condition has to be read with the actual material and instructions.
Test the loaded carry
Before the first hot use, load the cool pan with a safe substitute for the expected food weight. Wear the dry oven mitts you normally use. Check whether fingertips can get under the rim, whether the pan flexes, and whether both hands can keep it level. Clear a route to a heat-safe landing area larger than the total footprint. If the pan lacks handles, a slightly smaller, stiffer pan may be easier to control than the largest one the oven accepts.
6. Write the product brief before comparing products
- Task.
List the recipes, usual batch size, liner or rack, temperatures and cooking modes.
- Outside envelope.
Set maximum width, length and rim height from the cold oven, sink and cabinet tests.
- Usable surface.
Set the minimum flat floor and inside-rim dimensions from recipe spacing and liner fit.
- Construction.
Require exact material or alloy, coating or finish, thickness in millimeters, rim construction and pan weight.
- Limits.
Record oven temperature, broiler rule, liner and rack limits, utensils, cooling and prohibited uses.
- Care.
Require cleaning, dishwasher, drying, storage and replacement instructions that fit the kitchen.
- Identity.
Require maker, model, origin, food-contact documentation, warranty, recall contact and an authorized seller.
This specification can show that the pan already in the kitchen meets the job. It can also show that two smaller pans are easier to lift and rotate than one large pan, or that a deeper roasting vessel suits a liquid-heavy dish. “Buy fewer tools” works only when the tools that remain are properly specified.
Culinary Hub Store does not currently list branded sheet pans, prices, inventory, availability, sellers or checkout. Those details will remain disabled until authorized sourcing, complete specifications, accurate commercial terms, fulfillment, returns and warranties are documented.
Curated reader notes
Add a useful sheet-pan field note
Share a page-specific measurement, fit check, care lesson or specification question. Notes are reviewed before publication.