Kitchen note 003 · Prep surfaces
Choose a cutting board for the whole kitchen workflow
Material matters, but it is only one line on the brief. A board also has to fit the food, counter, sink, cleaning method, drying space, knife work, and separation plan you use every day.
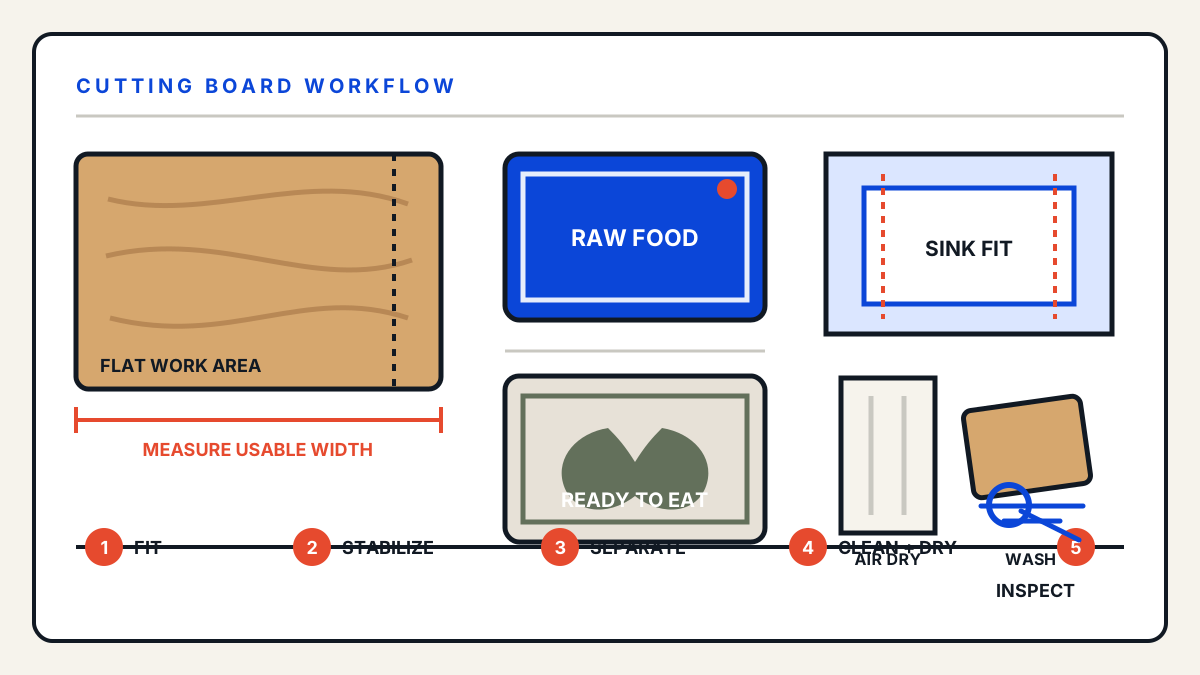
Cutting-board advice often begins and ends with “wood or plastic?” That shortcut misses the choices that decide whether a board is useful. An oversized board may feel excellent under a knife and still become a nuisance if it cannot fit into the sink. A thin board may store neatly and then slide, bow, or crowd the food. A dishwasher-safe claim does not help if the board blocks the spray arm, exceeds the rack, or warps at the maker’s prohibited heat setting.
Food safety also depends more on workflow than on a material slogan. USDA permits wood or a nonporous board for raw meat and poultry, while recommending separate boards for raw meat, poultry, and seafood and for produce, bread, and other ready-to-eat foods. CDC gives the same separation advice. The practical question is whether your board system makes that separation easy on a busy cooking day.
1. Map the jobs before comparing materials
List the foods and motions that happen on the board. Daily vegetable prep needs clear knife space and a convenient path to the pan. Bread may need length more than width. Carving a roast needs room for the meat, a fork, slices, and liquid. Raw poultry needs a surface that fits your cleaning and sanitizing routine without moving contamination through the kitchen.
Flat area first
Favor usable surface, stability, and a board you can clean immediately. A perimeter groove reduces the area available to the knife.
Contain and separate
Choose a board that supports a dedicated raw-food workflow and can be washed and sanitized by an approved method.
Liquid capacity
A groove or well is useful only when its capacity and location suit the food. It does not replace a rimmed tray when liquid is abundant.
Reachable and washable
A light secondary board can keep a tomato, lemon, or snack from turning into a full-counter cleanup.
Most kitchens benefit from at least two clearly distinguishable work surfaces: one for raw meat, poultry, and seafood, and one for produce and foods that will not receive another kill step. They do not need to be an elaborate color-coded set. Different color, shape, edge profile, label, or storage position can make the assignment obvious to everyone who cooks.
Account for allergies as well as microbes. In a 2026 study summarized by FDA, full cleaning with a wash-rinse-sanitize-air-dry sequence effectively removed allergens and minimized transfer across tested food-contact surfaces. The study also found that surface texture and material affected removal. A dry wipe or a quick visual check is not a dependable allergen reset.
2. Material changes care, weight, wear, and knife feel
| Material family | Strengths to verify | Tradeoffs to plan for |
|---|---|---|
| Solid hardwood | Stable mass, repairable surface, comfortable knife feel, long service life when maintained | Hand-washing or model-specific dishwasher limits, drying space, weight, periodic conditioning, cracks or open joints |
| Laminated wood or bamboo | Availability in many sizes, rigid construction, often lighter than a thick butcher block | Glue lines and maker-specific care; heat and soaking may split or delaminate the board |
| Polymer | Low weight, nonporous surface, many dishwasher-safe options, easy assignment by color | Knife grooves accumulate, thin boards can warp, feet may detach, replacement is expected as wear becomes hard to clean |
| Composite | Thin profile, rigid surface, some dishwasher-safe designs, easy storage | Harder feel under a knife, varying heat limits, edges and layers must remain intact |
| Glass, stone, or ceramic | Nonporous and easy to wipe | Hard, noisy surface that can be slippery and quickly dull or damage knife edges; poor general chopping choice |
USDA says consumers may choose either wood or a nonporous board. Nonporous surfaces are easier to clean, but that does not make every polymer board identical or every wood board unsuitable. Construction matters. A solid board and a laminated board may have different dishwasher instructions. A polymer formulation, thickness, rim, and feet influence whether the board stays flat through repeated washing.
Do not infer dishwasher safety from appearance. Read the care label for the exact model. USDA notes that nonporous acrylic, plastic, or glass boards and some solid wood boards can be washed in a dishwasher, while laminated boards may crack and split. If the manufacturer gives stricter directions, follow them.
For wood or bamboo, look for a documented finish and care plan intended for food-contact use. The maker should explain washing, drying, conditioning, stain handling, resurfacing if allowed, and what damage ends the board’s service. “Natural” is not a care specification.
3. Measure usable area, counter fit, sink fit, and storage fit
Published length and width may include a juice groove, handle, hanging hole, or broad rim. Measure the uninterrupted flat rectangle where a knife can travel. A board that is 18 by 12 inches overall may provide much less cutting space when a deep perimeter channel takes an inch from every side.
- Counter footprint.
Measure the available counter between walls, appliances, sink lips, and cooktop edges. Leave room for a scrap bowl and the ingredient waiting to be cut.
- Sink opening.
Measure the bowl, faucet clearance, and divider. A board that cannot rotate under the faucet can be difficult to clean without spreading water and food residue.
- Dishwasher envelope.
For a dishwasher-safe board, check rack height, tine spacing, spray-arm clearance, and the maker’s placement and drying instructions.
- Storage slot.
Allow airflow around the board. A narrow slot that holds a damp board against a wall can slow drying and hide moisture.
- Working thickness and weight.
Enough mass can improve stability, but the board still has to be lifted, washed, turned, and stored by the people who use it.
- Edge and groove geometry.
Confirm whether a bevel helps fingers lift the board, whether feet prevent reversing it, and whether grooves are broad enough to clean.
A practical board test uses ordinary kitchen objects. Put a chef’s knife, a large onion, and a pile of cut pieces inside the advertised dimensions. Add a mixing bowl next to the board. If the knife must work at the edge or the cut food has nowhere to go, move up a size or split the task between a board and a rimmed tray.
4. Stability is a safety specification
A board should resist translation, rocking, and spinning during normal knife work. Flatness comes first. Check the maker’s tolerance or return policy for a board that arrives twisted. For boards with feet, look for the number, placement, replaceability, heat limits, and whether the feet create inaccessible seams.
A damp towel or purpose-made nonslip mat beneath a flat board can improve grip, but it must become part of the cleaning routine. The layer should not bunch, extend into a burner area, or stay wet under a wood board after prep. Clean it when raw-food juices could have reached it.
Do not use a board that rocks because of warping, loose feet, a cracked joint, or a swollen section. The motion is a knife-control problem before it becomes a durability problem.
5. Buy for the cleaning sequence you will actually use
CDC advises washing utensils, cutting boards, and countertops with hot, soapy water after preparing each food item. USDA’s cutting-board guidance likewise calls for hot, soapy water after each use, followed by a clear-water rinse and air drying or drying with clean paper towels. Dishwasher cleaning is useful when both the board and its placement are approved by the manufacturer.
Cleaning and sanitizing are separate steps. Cleaning removes food and soil so a sanitizer can reach the surface. USDA provides a cutting-board sanitizing method using one tablespoon of unscented liquid chlorine bleach per gallon of water: flood the clean surface, allow the stated contact period, rinse with clear water, and air dry or pat dry with clean paper towels. A commercial food-contact sanitizer can be used according to its label. Never mix bleach with other cleaners.
Keep the exact current instructions accessible rather than relying on a handwritten concentration with no source or date. Bleach products vary, labels change, and some splashless or scented products are not the specified unscented liquid chlorine bleach. When in doubt, follow the product label and current USDA guidance.
- Move raw meat, poultry, and seafood on a dedicated board or plate.
- Do not place cooked food or produce on an uncleaned surface that held raw animal food.
- Pre-scrape food, then wash the entire board, edges, groove, handles, feet, and underside.
- Sanitize after contamination when current guidance calls for it, using a food-contact method.
- Let both faces dry completely before storage.
- Clean any towel, mat, rack, sink, or counter that contacted raw-food juices.
A board that technically can be cleaned but is too heavy for the sink, too large for the dishwasher, or full of narrow decorative channels creates friction at exactly the wrong moment. Ease of complete cleaning is a performance feature.
Juice grooves are a task choice, not a quality badge
A groove can catch some liquid while carving. It also reduces flat area, interrupts a bench scraper, and creates another channel to wash. Compare the groove’s width, depth, corners, and capacity. A narrow decorative line may collect residue without holding meaningful liquid.
If carving is occasional, a reversible board with one flat face and one grooved face can be useful, provided the construction permits both sides to work safely. Feet usually prevent reversibility. Another option is a flat everyday board plus a separate rimmed carving board or tray. Choose the arrangement that keeps liquid contained and cleanup straightforward.
6. Inspect by condition, not by calendar
USDA says both plastic and wooden boards wear out and should be discarded when they become excessively worn or develop hard-to-clean grooves. There is no universal replacement date because material, use, knife pressure, cleaning, drying, and construction all affect wear.
Under bright side light, inspect the center and the areas near grooves and handles. Look for deep cuts that hold dark residue, fuzzy or peeling surfaces, cracks, open glue joints, loose feet, permanent warping, swelling, or odors that remain after proper cleaning. Run a clean fingertip across the dry surface and check whether cuts have raised edges that resist brushing.
Some thick wood boards can be professionally resurfaced when their construction and maker allow it. Resurfacing must restore a flat, smooth, cleanable food-contact surface without exposing unsafe glue, fasteners, feet, or decorative inlays. A split joint, unknown finish, structural warp, or contamination that cannot be removed may make replacement the sound choice.
A practical two-board starting system
For many home kitchens, one larger stable board for produce, bread, herbs, and cooked foods plus one clearly different, easily sanitized board for raw meat, poultry, and seafood creates a usable baseline. Add a compact board for quick tasks only when it reduces cleanup without confusing the separation plan. Add a carving surface when liquid control is a recurring need.
Before buying, write down six numbers: maximum counter footprint, sink opening, dishwasher envelope, storage slot, minimum usable cutting area, and maximum comfortable carry weight. Then require documented cleaning instructions, a stable base, cleanable edge details, and a clear replacement path. Those specifications tell you more than a wood-versus-plastic argument.
Our Counter Test requires material details, care guidance, food-contact information, authorized sourcing, and clear limits before a board enters the preview collection. Brands, final specifications, prices, inventory, and availability remain disabled until supplier approval and accurate commercial terms are documented.